


It’s Friday 14th November 2025 and I’m not working today. I have lots that I need to do, but Storm Claudia (a Traitorous so & so), has kyboshed a lot of that. But one thing on my ‘to do’ list is to brew a beer for a forthcoming Chiverton Tap Homebrew Club competition. So, I’m brewing a “Schwarzbier”!
I thought I’d give a little rambling on how I go from a beer style to making something drinkable to a style. This won’t be textbook or even technically correct in lots of areas, hence this being the “Idiots (me) guide to brewing a beer”!
Everyone knows that beer is an alcoholic beverage. Some may also know that beers are made from 4 basic ingredients, the greatest quantity of which will be water, then grains (barley, wheat etc), hops and yeast. My brewing journey began when I wanted to understand how from those 4 ingredients you can make a session bitter, a light lager and a 10% ABV Stout. To explain how, here’s how I brewed my Schwarzbier and the steps I’ve gone through.
But if this seems “TLDR”, then the summary is:
- Add grains to hot(‘ish) water and make a sort of porridge
- Get rid of the porridge but drain all the (now sugary) liquid into a kettle
- Boil it (during which add hops) until sterilised, at least, and then cool it
- Pour into a sterilised container and add yeast
- Put a lid on and add a one-way valve so that it doesn’t explode under pressure
- Leave until it all dies down, then somehow make it fizzy’ish & drink it with friends
Before Brewday 1: Research…
The worthy winner of our last competition (Pete Hall, who brewed a superb 9.5% Belgian Tripel) gets to set the next competition & he chose for us to brew a Schwarzbier.
It turns out that the Beer Judge Certification Program (an organisation that trains and certifies individuals to judge beer, mead, and cider competitions) has a very long set of “Style Guidelines” that that they have developed to help ensure fair, consistent judging at competitions by applying standardised criteria to assess the quality and characteristics of entries. Dull, I know, but hey, ho!
It does however mean that anyone can find out what a Schwarzbier should look, taste and feel like to drink without even having tasted one! I managed to do some “research” last week at ISBFX and tried Amity Brewings “Festoon Black” 4.6% example.
According to the 2021 BJCP Style Guide for ‘8B. Schwarzbier’, it should be a “dark German lager that balances roasted yet smooth malt flavours with moderate hop bitterness. The lighter body, dryness, and lack of a harsh, burnt, or heavy aftertaste helps make this beer quite drinkable”. They then go on to give further detail about key characteristics of:
- Appearance (e.g. colour and how clear)
- Aroma (e.g. malty, bready, caramel, floral, spicy)
- Flavour (e.g. the malts and hop balance, sweetness, bitterness)
- Mouthfeel (e.g. syrupy or thin, fizzy or flat)
Before Brewday 2: And Design!
Having got to understand what I’m aiming to brew, I usually look online at lots of “recipes” for that style of beer, so that I get an understanding of the various ingredients that are common (essential, perhaps) for this style.
I then use an app called BeerSmith to build up my own version of that style. The app is very clever, having lots of formula built in to it as to how different ingredients and their additions in volume and time (I’ll explain as I go through the brewday, though) affect the final outcome.
Finally, with recipe determined, I order the ingredients online via specialists such as The Malt Miller, Get’erBrewed & Crossmyloof. When they arrive, I check the quantities and then store them appropriately (malts in a “mouse-proof, sealed container, yeasts in a fridge and hops in a freezer).
Brewday Cometh!
From reading lots of books (including the new brewers bible, John Palmer’s “How to Brew” which is now legally available free online), and evolving my own methods based on my available equipment and facilities, I have a laminated checklist and a brewday record sheet stuck to my Brewshed whiteboard. The process checklist evolves as I learn or my equipment changes more, usually through mistakes!

Either the night before or the morning of brewday, I’ll weigh out and store all the ingredients so that they are ‘to hand’. I then begin following my checklist, by setting up & filling the Hot Liquor Tank with water.
You’re going to find that Brewers use fancy words for stuff we have normal words for, so the “L – Liquor” in HLT means water. My “HLT” is basically a Tea Urn that has a thermostat on it and a tap.
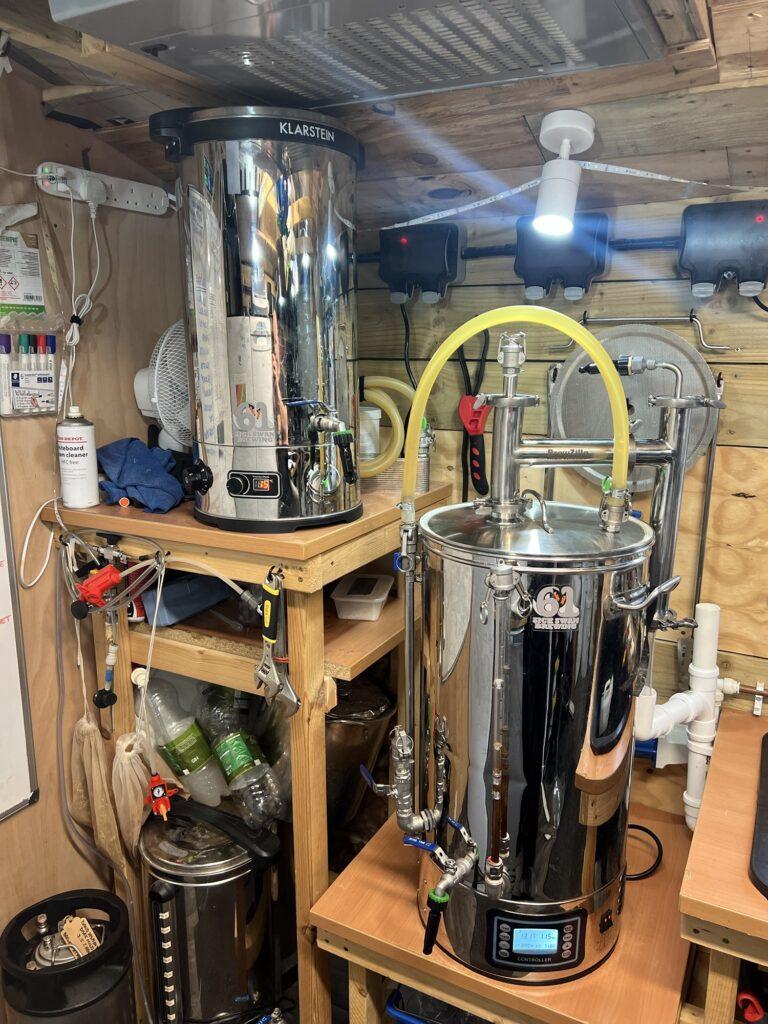
I then fill up my “All In One” System. It’s a space saving single vessel system (we Brewers like the word “vessel”). Basically, in a real Brewery there will be a Mash Tun and a “Copper”. In my set-up there is one contraption that does a few things, where needed, without taking up space.
The Mash Tun is where you make the aforementioned “porridge”, and the Copper is another Brewery code word for a big kettle (shakes head at the attempts to make it sound magical).
The Mash Tun needs to hold enough grain (which some occasionally call ‘grist’ but it’s not really by this point as it needs to be smashed up a bit to get sugar to leach out) and enough hottish water to create the right quantity of sugary liquid known as “wort”, but it doesn’t get pronounced like that (Headline reads “Brewers in over-complicating simple things shocker”).
In my system, there is a big vertical tube that has a heater in the bottom of it. That’s the kettle bit. Then, there is a big tube ‘sleeve’ that fits inside the slightly bigger tube that has a circular, perforated bottom to it that’s a few inches above the heater.
This allows the water to pass through, without allowing most of the grain though because that would burn on the heater element and make the liquid taste rank. It also means that I can heat the sugary liquid (that is actually pronounced “wert”) back up to the temperature that it’s supposed to be.

You want to get a decent quantity of fermentable sugars (the stuff the little yeasties like to eat) out of the grain so that its efficient use of the grain, but temperatures also change the activity of the different enzymes, and they pull sugar out of the grains that are fermentable or non-fermentable, starchy carbohydrate dextrin. Temps around 63-66°C help produce a drier, lighter body to the beer and 68-70°C give a fuller bodied and sweeter beer. Chemistry lesson over for now!
Even though I could and have brewed “SMASH” beers, where you only use a Single Malt And Single Hop, for the Schwarzbier I needed to use a mix of malts. The biggest proportion used are known as base malts and they do the heavy lifting in terms of giving up sugars but do also affect colour and flavour. The others are referred to as adjuncts, who’s job it is to tweak flavour, colour, head retention and mouthfeel. In this beer it needed to be dark so I used Chocolate Malt and Carafa that add lots of dark colours and flavours.
I stir in the (cold) 5Kg of grain to the 72°C hot water, which reduces the temperature to about 66°C, all the while making sure there are no dry lumps & clumps as that would be a waste of potential sugar.

Basically, I then kept the water washing through the grain at around 66-68°C for something around an hour (sometimes called “Vorlauf”). I went inside the house and played on the Xbox for a while. Eventually I’d rinsed all the decent sugars, colour and flavours out of the mash grains. So, I then raised the temperature of the wort up to 75°C, putting the handbrake on those enzymes and letting that finish off the final 10 minute rinse. I then lift that inside tube up and rest it so its above the big kettle and let all of the wort drain into the kettle.
The mash is still damp so I have to work out how much has been absorbed and then work out how much ‘new’ hot water to rinse through the mash to get the right volume of water needed for the next stage. Bear with me but I then do some sums (I do them in advance actually, but…)

I work out the total grain bill (e.g. 5Kg) and multiply it by about 4 to give me how many litres of water I need before I ‘strike’ the grain into it – 20L. Science and experience tells me I will lose about 800g of water per kilo of grain, so around 4L, leaving me with 16L, right? Now I also know I’m going to lose water in a few other ways later, so I need to account for that in advance of eventually drinking 19L of beer from my keg.
Once calculated (it’s not as difficult as I made that sound), I pull 12L of the 75°C hot water from the HLT and pour it through the mash as evenly as possible. This is known as Sparging (or lautering – don’t blame me!). Then after about 10 minutes, I have a kettle with around 28 litres of wort in it, and I put a complicated looking lid on it. Hurrah!
I hit the buttons on the kettle and get 3000 watts of electricity to heat 28L of water from 75°C up to a 100°C boil. This isn’t instant so I went and made a cup of tea and started cleaning stuff I won’t use again today. I also prep for the slightly busier part of the day that is coming up by making sure I have everything I’m going to use from here in clean, sanitised and “to hand”.
When my All-In-One “pings” to tell me we have a boil, then this is a step up in activity as this is where the hops get in on the act!

What the feck are hops?! They’re the cone-shaped flowers of the female hop plant used to provide bitterness, flavour, and aroma, because they contain resins and oils that add a range of tastes and aromas (such as citrus, pine or floral) to a beer. However most of the time I cut the crappy bits out and use processed hops in pellet form (looks like rabbit food) as they are more efficient.
Hops also act as a natural preservative, which in the 1800s, along with being stronger in alcohol, helped Pale Ale last longer. This helped when the Posh Brit General types sent essential staples such as beer on the very long sea voyage to lesser army types who were out in India, making sure they knew they were part of the British Common Wealth [sic]. Hence the India Pale Ale (it’s not fecking INDIAN Pale Ale”)! We were so inclusive and generous, when it suited us, right?
Anyhow, in my head there are two main oils and they bitter or they impart flavour and aroma. Some hops such as Magnum, are really good at adding bitterness, but are a bit “meh” on aroma & flavour, whereas some, like Citra, Mosaic and Galaxy are really best used when pulling aroma and flavour.
The longer a hop is in boiling water, the more bitterness is added, the later a hop is added to the boil, the less bitterness and more of the aroma and flavour is released, so you slide them around to play to their strengths over the 60 minutes that you boil. You can even add hops after the boil and let them swish around in the pot at about 80°C for a while. If your kit allows and you can spin the wort around during that time it’s known as the whirlpool, with having an added benefit of piling any crud up in the centre of the kettle so you can draw off clearer wort.
Some beer styles demand a level of flavour and aroma hoppiness that is mega, such as a New England IPA (NEIPA), where you add hops during fermentation or even after. This is known as Dry Hopping. Do it twice or add twice the amount and you get a DDH beer.
In this brew, I decided that I only needed to add some Magnum and Saphir hops at about 30 minutes from the end of the boil and then some more Saphir just 5 minutes before the end of the boil to get what I hope is the right balance of bitterness, aroma & flavour.
In between those points in time, around 15 minutes from the end of the boil, I threw in half of a tablet of Protofloc which is made from seaweed and makes proteins clump together, and fall out of the wort, helping make a clearer beer, which with lagered beers is pretty much a “must have”.

I also redirected the pump so it pushed wort from the bottom of the kettle out and through a Counterflow Plate Chiller that the nice folks up at Torrside donated to me. The hot wort passes into the plates and then out and back to the kettle. This first 15/20 minutes means its sanitised, but that’s all.
At the end of the boil though, the heater is turned off, and the wort begins to cool. Time is now of the essence as we don’t want any creepy crawlies and bugs getting in the brew from here on in (not that we did earlier, but now its even more critical). I’m also off out to the pub later and so don’t want to be late!
The Counterflow Plate Chiller (CPC) has another side to it and when I connect a cold water tap to an inlet and push that through the other side of the brew plates, it cools the wort down with a decent efficiency and speed. “Repeat the flow until cool”.
By the way, during the boil and subsequent cooling a few other things have happened. Steam has come out of the brew and been condensed and used to make a bowl of hot water I use for cleaning, and the hops have soaked up some of the wort. I have lost some of the 28L of hot wort. But I also “loose” 4% of the hot wort because hot fluids shrink when cooled.
Between 100°C and below 19°C, I clean and tidy to make sure there’s as little left to do as possible after today’s final stage, transferring the now 22L of cooled wort to the fermenter and adding the yeast.
When the wort is close to cool, I take a sample and put it in a vertical measuring flask and add a floating hydrometer. This bobs and the settles and shows me a reading of “specific gravity” (how much sugar is in there, in mega simple terms). I aimed for 1.045 and got 1.050, so a bit more sugar than expected. I’ll cover that off in another blurb when this beer finishes fermenting perhaps!

The fermenter I used today is a simple’ish clear, plastic ball-like container that has a big opening at the top and a fancy seal and lid that has connectors on it. Already cleaned and sanitised, I stop the pump and redirect the outlet from the CPC to the fermenter and begin pushing the wort from the kettle. From a height! So it splashes, creates a foam on the wort and aerates the brew. I then open the packets (two today) of dried yeast and pour it in, before transferring the remaining wort into the fermenter.

Once done, I put the (sanitised) lid on, screwed down the holding ring and put it in a modified double height freezer. It’s modified insomuch as I can get two fermenters in there and it will be a freezer, until my temperature controller tells it not to be and instead turn the greenhouse heater on to maintain whatever temperature I choose.

Lager yeast ferments at cooler temperatures, produces a cleaner, crisper flavour, and is what’s known as a bottom-fermenting strain, so I’ve set this to 10°C, whereas in my last brew (a NEIPA) I used an ale yeast which ferments at warmer temperatures, results in a fruitier and more complex flavour, and is a top-fermenting strain.
The fancy lid has two connectors on it – one that has a floating ball and filter on the end of a tube that dips into the beer (its now beer because the “yeastie boys” have joined the party) which will allow me to draw it all out in a while without all the “trub” (pronounced “troob” and is the hop matter, grain bits and fingernail clippings) , and one that allows me to push CO2 in to pressurise it, but during fermentation allow pressure to release via a “Spunding Valve”, where I can set the pressure above which it will be released..

The pressure comes from the fact that those funky yeastie boys love a party when beer is involved! The greedy buggers breathe and therefore remove oxygen and eat as much of the sugar as they can until they suffocate or die of a heart attack, one assumes. Between which though, they fart a lot of CO2 and piss out a decent amount of alcohol. Sounds familiar, doesn’t it!
Anyhow, that waffle turned out to be a lot longer than I anticipated so I’m going to shut up for a while and let the yeasties ferment that beer for 2-3 weeks, before we lager it (“it’s a process not a drink”) for another 5-7 weeks, maybe longer! Lagers take a while!
Maybe next time, I’ll waffle more on yeast and why its got more about it than an itchy camels toe.
So, until next time (unlikely if you tried reading this dirge), Cheers!